Building on various blog entries for a basic Arduino or Arduino on a breadboard I’ve found the ATMega328 chip really easy to use and program. This allows me to build circuits running Arduino for around £2 – cost of an ATMega328 chip & bypass capacitor. It does require investment in an Arduino UNO or similar (£10) to act as a programmer.
Once I became comfortable with beginner level Arduino and started looking at these chips, I didn’t see much point in having the bootloader. Luckily it’s very easy to setup these chips in a circuit and program via SPI using an Arduino UNO (or probably any other ATMega based Arduino)
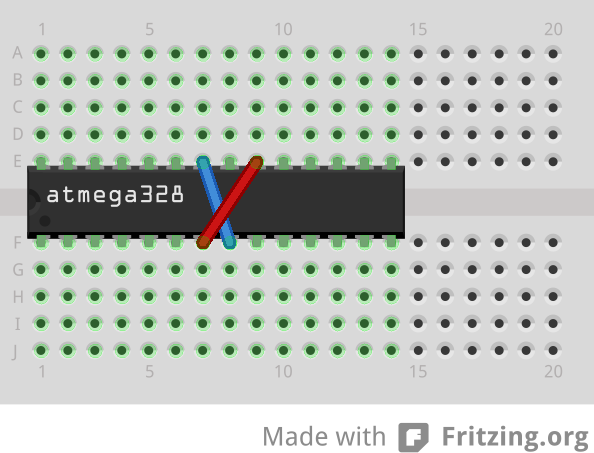
For a very quick setup all I do is connect VCC & AVCC to a power supply (3.3V or 5V) and the 2 GND pins to Ground. That’s it. It’s enough to get the chip going as long as it’s setup to use the internal oscillator.
If the chip arrives with a Uno Bootloader installed or even basic factory settings I prefer to change the settings to suit my needs. For this the fuses need to be set appropriately. The best resource I’ve found to determine the fuses is this link.
My preferred setup is to run the chip at 8MHz using it’s internal oscillator, no bootloader and brown-out detection at 2.7V. This gives me a setting of:
low_fuses = 0xE2
high_fuses = 0xDF
extended_fuses = 0x05
With this information I created my own Arduino board setting that I save in boards.txt under Arduino/hardware/breadboard/ folder.
atmega328abb.name=ATmega328 @ 8MHz – no bootloader
atmega328abb.upload.protocol=stk500
atmega328abb.upload.maximum_size=32256
atmega328abb.upload.speed=57600atmega328abb.bootloader.low_fuses=0xE2
atmega328abb.bootloader.high_fuses=0xDF
atmega328abb.bootloader.extended_fuses=0x05
atmega328abb.bootloader.path=empty
atmega328abb.bootloader.file=empty
atmega328abb.bootloader.unlock_bits=0x3F
atmega328abb.bootloader.lock_bits=0x0Fatmega328abb.build.mcu=atmega328p
atmega328abb.build.f_cpu=8000000L
atmega328abb.build.core=arduino:arduino
atmega328abb.build.variant=arduino:standard
With this in place when I restart Arduino, I can see an additional entry under Boards.
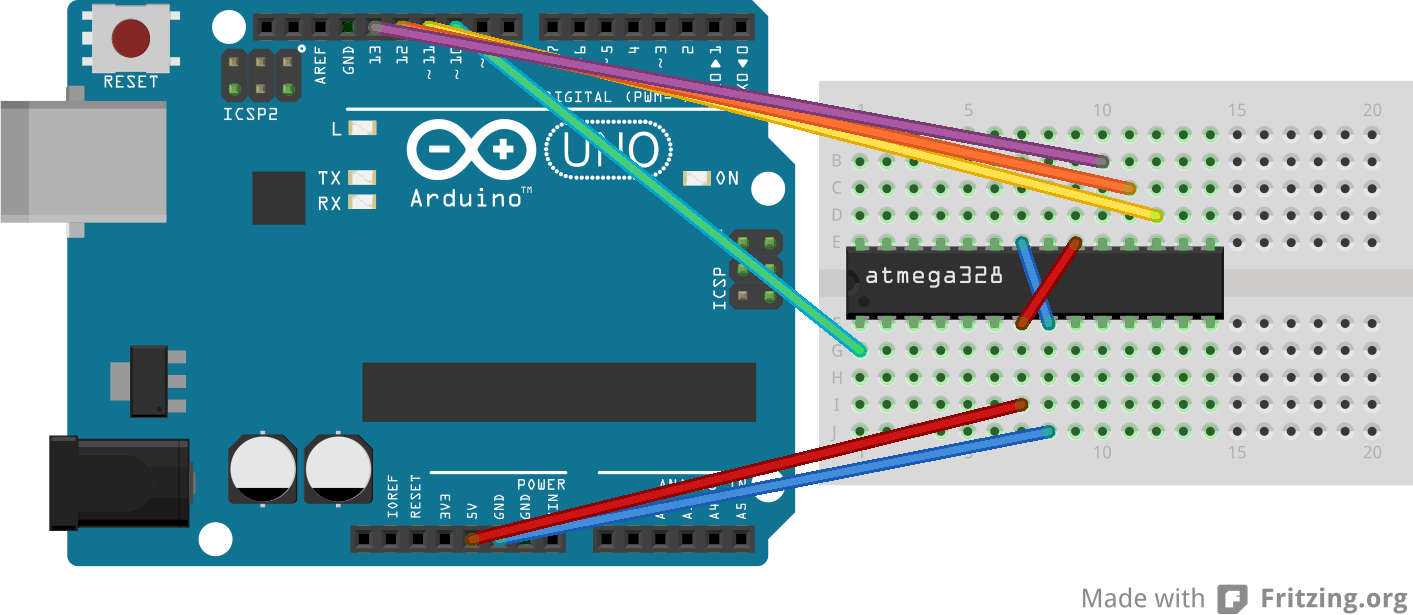
To burn the fuses to the chip I first load the ArduinoISP sketch on to an Uno (remember to choose Board = Arduino Uno when loading the ArduinoISP sketch). Then I hookup Uno pin 10 to Reset (PC6) on the chip, pin 11 to pin 11 (PB3/MOSI), pin 12 to pin 12 (PB4/MISO) and pin 13 to pin 13 (PB5/SCK). Note – 10, 11, 12 & 13 pins are used to allow communication via the SPI protocol.
Then I choose the Board (ATmega328 @ 8MHz – no bootloader) and then: Tools -> Burn Bootloader helps set the fuses. Note: Since the boot loader.file is specified as empty, the Arduino IDE will display an error. This is OK and the fuses have been reset.
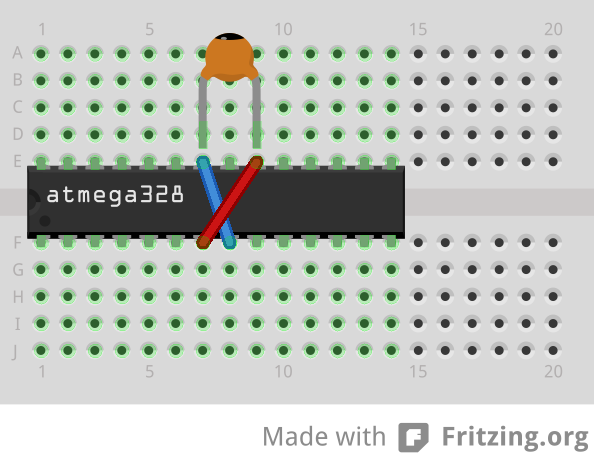
If the chip came with an Arduino UNO bootloader it probably means the fuses are configured to expect an external 16MHz oscillator. In this case we need to add a crystal between XTAL1 & XTAL2 with 22pf bypass capacitors grounding both XTAL1 & XTAL2 pins. This is needed so that the chip can start up to receive the fuse set commands. Once the fuses have been set to use the internal oscillator, the crystal is no longer required.
To test everything went well, load up the blink sketch and upload it to the chip via “Upload Using Programmer”. Hopefully everything uploaded successfully and to see it in action hookup an LED to pin 13 via an appropriate resistor.
Finally when using the chip in a circuit I take the precaution to add a 0.1 uF bypass capacitor between VCC and GND. I also make sure I have a reservoir capacitor (say 47 uF) at the power supply to ensure a steady voltage.
With just this setup I’ve been able to make very good use of these chips and have them run very reliably.